Tip of the Day 87: Setting up Templates by Machine
At RJG we hold that the in-cavity conditions are what control the final part characteristics (plus melt preparation). In instrumented molding we make cavity pressure templates that, if matched, produce the parts closest to the original. In order to keep these in-cavity conditions the same when moving a mold to a different machine the controls on the new machine may need to be set up differently to match the cavity pressure template.
In conjunction with this we are finding more and more that the machine based injection template (speeds, pressures and times) has great value in re-setting a machine setup to its or original form. Sometimes machine maintenance, wear or mis-calibration cause the numbers entered on the controller to not produce the same machine response. Or sometimes the process setup sheets are not as « pure » as you would like. The eDART lets you save more than one template for a given process. So here is a technique for using templates to reset machine setups each time a job is run so that you get as close as possible to the original cavity conditions the first time.
Step 1: Make a template on the first machine with the best, most centered process. Name the template with the machine’s name, possibly preceded by something descriptive; for example « 503B – QC Approved » where « 503B » is the machine name.
Step 2: Transfer the mold to a different machine, say « 308A ».
Step 3: With cross-copy (running on the EDM or our older « Server »), starting the job on the new machine will automatically bring up the currently set template from the first machine as shown below. The process is shown set up exactly as the other machine (see « Normalizing », tip #74). You can use the stroke and pressure curves or the cycle values as defined in tip # 73.
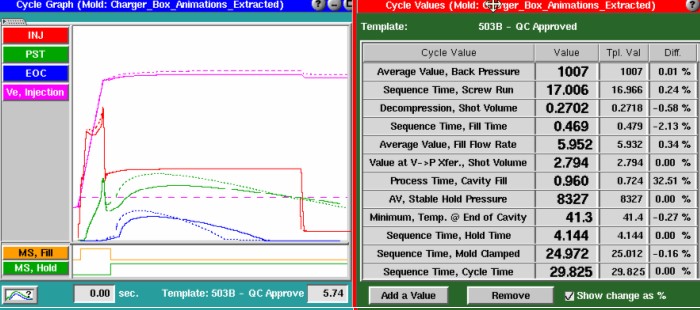
But you can see the cavity pressures don’t match. Here we are showing the condition of a leaky check-ring on the 308A machine. The machine’s volumetric flow rate is the same but the cavity fills later. Of course you need to make sure cooling and melting are the same.
Step 4: Adjust the 308A machine setup using systematic molding techniques: short shots, eDART data etc. to match the cavity pressures as shown below. You can see that the machine speed and volume had to be increased (transfer position decreased) to get the same short shot in the same fill time and then for the cavity to fill in the same time (Process Time / Cavity Fill).
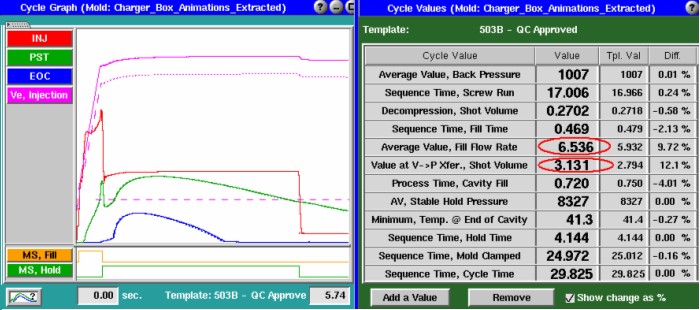
Step 5: Set the Volume at Fill on the cycle graph to the new transfer point (tip #53). The cycle values window above has the two machine values that changed shown in red ovals.
Step 6: Save a new template with the name « 308A – QC Approved ». The new setup for the machine will be different but the cavity pressure template will be approximately the same. Of course it will look quite similar when matched, as shown below.
Step 7: Train the operators who set processes to always select the template with the matching machine name. If you are going to use the cycle values instead of the curves for machine setup you will also need to have them reset the volume-at-fill using the cursor or by making a short shot.
Note for the future:
While step 7 above is a manual one we hope to release an automated method with eDART software release 8.6 (summer, 2008). This would use the machine name from the job setup to select the correct template without the extra manual step. It would also save the volume at fill with the template.