
Tip of the Day 70: Levels and Folders
There has been some confusion over the years about the “levels” or different fields that you can enter under the Job Setup screen on the eDART. This tip explains what they are for.
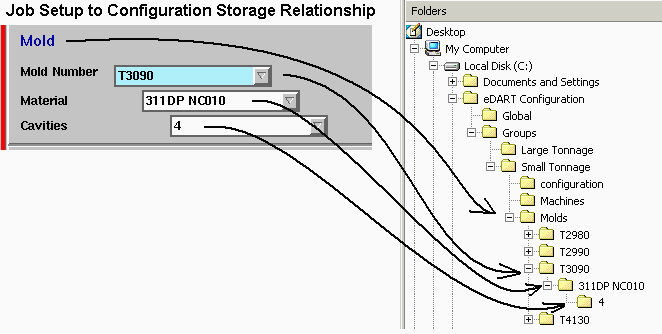
The key point is that the eDART creates a folder (or “directory” in programmer-speak) for each box into which you can type: Mold, Material and Cavities. The structure of the folders on the disk mimics that of the Job Setup window as shown below. This image shows an explorer window expanding the folder structure on a cross-copy server. The folder structure is the same inside the eDART.
Folder Content
Each level of folder stores certain information pertaining to that part of the structure as follows:
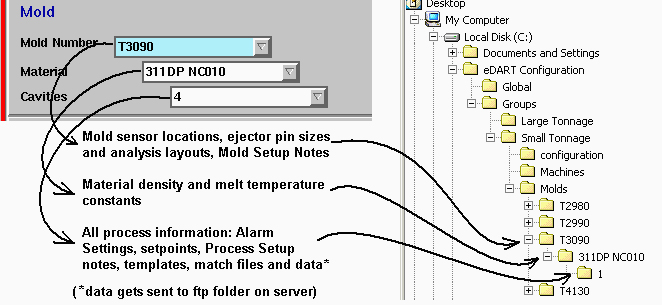
Mold: Sensor Locations that pertain to the mold (e.g. sensors or valve gate outputs) and ejector pin sizes. This folder also keeps the layout for the various analysis screens; i.e. what curves are up on the graphs and which values have been added to the cycle values or statistics tools.
Material: Material density and constants for figuring melt temperature.
Cavities: All of the configuration information that makes up the process plus the analyzer data: Alarm Settings, control setpoints (V->P and valve gate), templates, Setup Notes for “Process”, process match etc.
A note about Cavities
While the word “Cavities” implies a numerical value you are not required to use it that way. One customer had three different inserts for a wire spool core that went into the same mold. He had three different processes set up and the cavity levels were named “046”, “063” and “023” for the grooves in the spool that fit the wire. Another customer had different fabrics that were over-molded and each had a different thickness. He used the “Cavities” field to describe the different processes.
What does it all mean?
- You do not need to fill in anything in the white colored fields. Only the blue are required.
- If you never change material or material color or cavitiation layout then you can leave the “Material” and “Cavities” levels blank. We can customize the eDART so that these extra levels do not appear.
- If you leave one level blank then all of the items that would be stored below are stored in the next level up. For example, if “Cavities” is blank then all of the process data described above (alarm settings, templates, analyzer data etc.) will be stored in the material folder.
- If you do change material (or want to document it) you should fill in that level. That way when you run the same mold with different materials you do not need to re-enter the pin sizes, sensor locations and all of the analysis tool setups since they are stored in the mold folder.
- If you change cavities (blocking some) or cavitation layout (or want to document it) you should fill in that level also. The process will be substantially different with a blocked cavity, a different sized insert or a different thickness of substrate material. Each process will require different alarm settings, templates, controls and so-on.
More detail available upon request.